|
TextureCoordinates |
|
by Johan "Yomat/Nature" Mattsson This document is closely related to texture-mapping of polygons. Thus you need to know some about drawing texturemapped polygons before you will have any use for the information here. In texture-mapping we are assuming that we already know the texture coordinates, associated with each vertex of the polygon. Now we want a way to do a more object related study of texture mapping, where we want to apply a texture surface to a 3D object. A 3D object that we consider being composed of many polygons; a so called polygon mesh. A texture image can be tiled over an object or a polygon several times.
In effect this is like putting an infinite amount of textures side by side
in every direction while keeping the same relation to itself in all sub-images.
Surface description
Each face is associated with a surface. A texture map surface has an image reference and the following parameters associated with it:
x = x - center.x;
y = y - center.y;
z = z - center.z;
u = x/size.x + 0.5;
v = -z/size.z + 0.5;
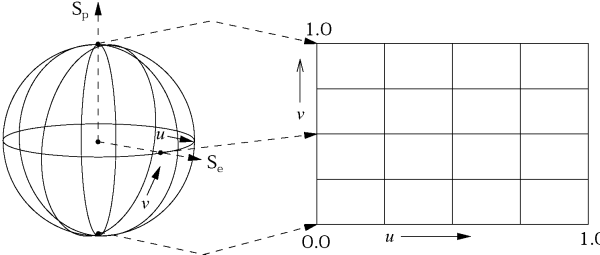
longitude = atan2((float)-x, z);
latitude = atan(y / sqrt(x*x + z*z));

longitude = 1.0 - longitude / (2*PI);
latitude = fabs(0.5 - latitude / PI);

u = longitude - floor(longitude);
v = latitude;
The previous section showed how we from a 3D-coordinate, of an objects polygon, can calculate an (u,v)-coordinate. If we want to draw the texture-mapped polygon, we can calculate the (x,y,z)-coordinate on the polygon for every pixel. Then we also have to do the mapping calculation for every pixel. This method works perfectly. However, this approach has little to do with the interpolation techniques we want to use when texturemapping a polygon. Secondly, this method would be hideously slow; we are considering a function call with 10-20 FPU-instructions and several calls to arctangent functions. If we satisfy ourselves with calculating the (u,v) for only the vertices of the polygon, we will get a number of problems connected with the interpolation mapping techniques: When we are doing planar and cubic mapping, we can get what we call a wrapping-problem. This occurs when the texture image seam (the line formed where the image meets the copy of itself) crosses an edge of a polygon. Similarly; when any of the resulting (u,v)-coordinates is larger or smaller than the image boundaries. Here we consider two possible ways of solving this problem. The straightforward way is to split all polygons where they cross the image seam. It works nicely, but have a major drawback. Splitting might result in many more polygons. The more polygons, the slower the handling and drawing of the object will be. Another approach, and the one we chose to use, is to produce a new texture image. This new image contains the problematic image tiled as much as necessary, so that all faces can be mapped without a seam problem. We also want to minimize the size of the larger generated image. It can be done by the following steps:
/* This is the optimizing step and it also removes all negative coordinates. */ if (minu < 0) udisp = ceil(-minu); else udisp = -floor(minu); if (minv < 0) vdisp = ceil(-minv); else vdisp = -floor(minv); A keen observation will tell that we might get incorrect result, if
texture image will not fit a whole amount of times into the 256 wide memory
buffer. To avoid such problems when doing much tiling of a texture onto
an object, the User Designer should only use images that have sizes that
The use of spherical and cylindrical mapping, adds interesting features to the modeling stage of a 3D world. Unfortunately it introduces nasty problems when it comes to finding the appropriate (u,v)-coordinates of the vertices. The main problem with these mapping types is that they will not work or look proper when not used on the right kind of objects. The approximation techniques below, tries to handle the case when the object we are trying to map has a similarity to the geometry of its mapping type. For instance, trying to spherical map a cube might produce very bad results, but a sphere or a cone will look better. The circular coordinates of both mapping types introduces a new kind of wrapping problem. Since we are dealing with angles, we can only get 0.0 to 1.0 (360 degrees) as u-coordinate. The bad thing happens when a the image seam crosses a polygon so that we get angles close to 1.0 and 0.0 at the same time, where we should get more than 1.0 (or similarly; negative coordinates). It is clear that we can not apply the tiling trick discussed above directly to this problem. We have to have a method to decide when a polygon is crossing a seam, and then do necessary modifications so that the tiling will be possible.
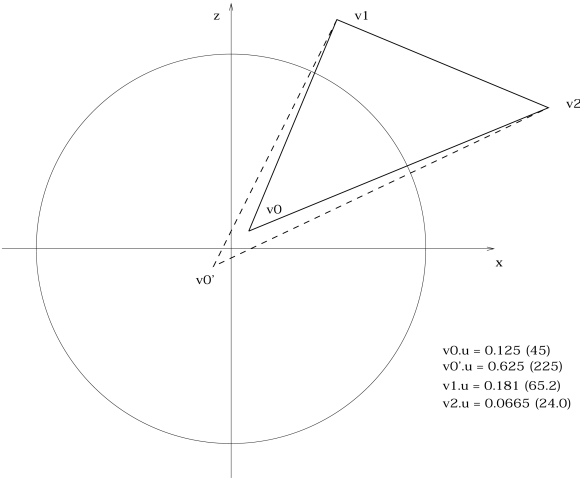
for (j=0; j < face->count; j++)
  for (k=0; k < face->count; k++)
    if (0.5 <= fabs(uv[j].u - uv[k].u))
      flag |= 1;
If there is such a difference we have to add 1.0 to all u-coordinates, of the polygon, that are less than 0.5. Consider the relation concerning distances between the 3D coordinates, of the vertices of the polygon, and the mapping axis. If the distances are relatively larger than a certain limit, the coordinate closest to the axis will loose its meaning in relation to the u-coordinates of the other vertices. See Figure below. The constant limit value with the best results, has to be discovered by experimenting.
The best method to solve this problem would be to split all polygons that has vertices too close to the axis. The split should be done in a manner such that, the difference in angles should be no more than a certain threshold. This would result in a large amount of triangle slivers, all with the small pointing towards the axis. In real-time applications the splitting method is not a good option. The quite approximative solution suggested, is to assume that all problematic polygons have only one vertex close to the axis. The other vertices of the polygon are assumed to have relatively small angle-distance and large relative distance to the axis. If this assumption holds. We can ignore the u-coordinate of the vertex that is close to the axis. Instead we calculate a new u-coordinate by averaging the u-coordinates of the other vertices. For this to work we must have a way to deduce which vertices that are
in fact too close to the axis. A simple way that we chose; check if a vertex
coordinate, in the plane orthogonal to the axis, is under a certain predefined
limit. The following code does the trick:
#define TEX_EPSILON 0.05

  float uval = 0.0;

  for (j=0; j < face->count; j++)
    {
      vrt = &obj->verts[face->vx[j]];

      /* Different tests for different mapping axis. */
      if ((surf->tflags & SRF_TFLAGS_X
           && fabs(vrt->y) < TEX_EPSILON
           && fabs(vrt->z) < TEX_EPSILON)
          ||
          (surf->tflags & SRF_TFLAGS_Y
           && fabs(vrt->x) < TEX_EPSILON
           && fabs(vrt->z) < TEX_EPSILON)
          ||
          (surf->tflags & SRF_TFLAGS_Z
           && fabs(vrt->x) < TEX_EPSILON
           && fabs(vrt->y) < TEX_EPSILON))
        {
          index = j;
        }
      else
        uval += uv[j].u;
    }

  if (index >= 0)
    uv[index].u = uval/(face->count-1);
Conclusion and References With some thoughts its easy to realise that its impossible to approximate the coordinates pefectly and sometimes not even close. However one can achieve good enough results as can be seen in some of the demo-productions out there like 'Rise' and 'Relic' which doesent have the standard planar type mapping everywhere. One quick practical observation is that for a renderer to make use of the texture coordinates of the scheme described above, it need to have support for distinct texture-coordinates for each polygon. This compared to, for example, planar demostyle environment-mapping where one uv-coordinate per vertex is enough.
|